I promised a tutorial on painting flower pots and it's time I deliver. We've had crazy rain storms the past few days so I took advantage of today's storm and worked on painting some new pots for my tiny front porch. Once again, I was inspired by pinterest. Here's my disclaimer...I am by no means an expert on how to do anything, this is just me showing you how I completed my own flower pots. I hope it helps! Okay, so here is the inspiration picture:
Aren't they adorable?! I finally got around to checking out her blog (you can see it here) and OMG, she is amazing. She used a silhouette machine (super $$$) and outdoor vinyl to cut out the label, which is why it looks so professional. I don't have the equipment she used so I just free handed my own stuff. You can do either depending on the amount of time and energy you want to put into it. Here's how mine turned out:
Not nearly as professional looking but not too shabby for having free handed it. I once again used leftover paint I had from some of the rooms I painted when I first purchased my home. In order to complete this project, you will need to start with a clay pot or whatever pot you may already have in mind. I choose clay pots because they're super cheap and easy to paint. I also use foam brushes to apply the paint and purchased a cheap baggy of spouncers (little round foam brushes) to paint on the polka dots.
Here are more of the materials I used:
I chose a Krylon indoor/outdoor clear sealant to help protect the paint since these pots will be out and exposed to the elements.
I started with the small pot first and gave it a coat of cafe latte paint
Here's what it looked like after one coat:
After the second coat, I plopped it on top of one of my spray bottles (super high tech) to keep from smudging the paint or getting it on the counters.
After about 20 minutes, the paint was dry enough to allow me to start painting on my polka dots.
Just dip your spouncer in some paint, dab off any excess and dot around the pot in semi-even spaced rows.
Here's what it looked like with all the polka dots done.
Then I decided to get brave and free hand the number label....not the best idea. The white paint didn't cover the polka dots well.
I learned my lesson and painted the white area before applying polka dots to the bigger pot.
After the white paint had dried, I free handed the numbers and outline with a small paint brush. They came out so-so.
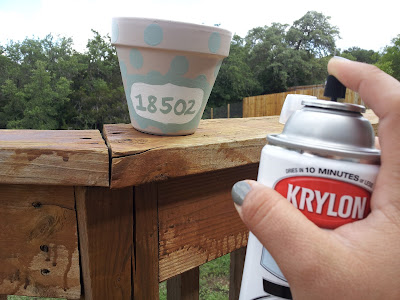
I gave it about 30 minutes to dry then took it outside (once the rain stopped) and sprayed on the sealant.
I left the pot out for another hour or so to completely dry. Later in the evening I ran out and bought some white lobelia and a succulent to plant in the pots. I'll be doing that tomorrow and will edit this post with a picture of the tiered pots. All in all, I was happy with this project. It was a bit time consuming but I like the idea of personalizing my own flower pots instead of paying high $ for pre-painted ones. I think the polka dots give it a bit of a whimsical feel and that makes me happy. I hope this tutorial is helpful if you are considering painting your own flower pots. What do you think, worth the time and effort or a complete waste?
It is too much Lobelia, and it just looks a big mess! I will be moving them to my flower bed and will just stick with the vincas. So I guess there will be yet another update picture tomorrow :)


I love it! I wonder how acrylic paints would look? If they would even hold up outside?
ReplyDeleteActually most of the bloggers who have painted clay pots have used acrylic craft paint. It might even work better. I'm super cheap so I use what I have. When I was choosing paint colors for my house I bought a bunch of samples of colors I liked and even though some of them didn't get used on the walls, they are now getting used on other things. I'd say if you have some you like, use it, but if you don't, then definitely go with acrylic.
ReplyDeleteI have a bunch of acrylic paint left from nursery crafts so that's why I asked. Imma try them and see how they work I like the matted finish versus the glossy tho so we shall see :) I'm on this DIY train with you lol
ReplyDeleteYay! DIY is so rewarding and fun! I save so much money making my own things and I get a sense of pride at having made something versus buying something someone else made.
ReplyDeleteI showed Jeannine this post and she wants to do the same with her pots! You inspired her. Hehe. Anyway, it really is a beautiful way to transform ugly clay pots in to something attractive. Your pots came out just as good as your inspiration picture. Although, I do like the way the did the outline in black paint. It stands out a bit more.
ReplyDeleteWoohoo! Go Jeanine! Send me a picture when y'all are done and I'll put it up as a Reader's Space :) I also love the back in the inspiration picture, except it's not paint. It's black vinyl that she cut with a silhouette machine, which is why it's so perfect. No worries, I finally stopped being cheap long enough to order my own silhouette! After it arrives, I will be labeling everything in site haha!
Delete